48V Hybrid Electric Generator IGBT Repair Module (4N0 903 028N/J/P) for Audi A8 D5 Installation Guide
- Botong Auto Electronics
- Oct 9, 2024
- 2 min read
Many people have purchased the 48V Hybrid Electric Generator IGBT Repair Module (4N0 903 028N/J/P) for Audi A8 D5 but find it challenging to install. This article will provide a detailed overview of the entire installation and testing process, showing you that it’s not as difficult as you might think.
There are three model generators on the market: 028J, 028N, and 028P, with 028P being the latest improved version, though it may still experience failures. We will use the previously returned damaged generator 028J as an example for teaching purposes through disassembly.

Disassembly Process
During the disassembly process, there are eight screws on the cover that need to be removed carefully, paying special attention to prevent deformation of the cover. Before removing it, the cover should be heated to make it easier to detach the adhesive part on the back, especially in cold weather. After heating it with a heat gun until it is hot to the touch, gently pry open the cover with a small screwdriver.

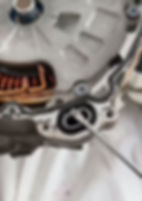
After opening it, we can see traces of original repair welding in this generator, indicating that it has been repaired once before. We can also see signs of damage on the UV IGBTs, so we need to replace these two units.

We need to use this grinder to separate this part. To prevent debris from contaminating the undamaged IGBT, we should cover the good parts with tape while grinding.


There is no need to grind all the way through; instead, grind halfway and then use a tool to pry it open. There are a total of three units that need to be ground and then pried open.

We can see that the four points on top are the positive terminals, while the ones below are connected to the negative terminals. Next, cut these three connections (it's recommended to use flush cutters), and use a knife to sever the connections on both the left and right sides.

Board Separation
When trimming the positive and negative terminals, we will keep the positive terminal on the right side, while the negative terminal below can be cut shorter since it’s unnecessary. On the left side, the positive terminal can be cut slightly shorter, but for the negative terminal on the left, don’t cut it too short; it should be cut close to the IGBT.
Now the IGBT and the main board are completely separated. Don't rush to remove it yet, as there are still two screws securing it here.
Let's first use a utility knife to pry open the board. When prying, be careful not to insert the tool too deeply, as it could break the seal.......

The seal is located in this position.

Now the entire main board has been removed. This is the seal; be careful not to insert the tool too deeply while prying, as it could break the seal and lead to water leakage.
We can see that because this is a second repair, the solder in this area is too heavy, making it difficult to remove. We must ensure we clean up the solder properly before taking it out.

............................................................................................................................................................
If you want to learn the full article on the installation and testing process, please contact us at botongelectronics@gmail.com.